Guide to Wire Rope
MENU
- Structural Wire Rope Applications
- Computer-Assisted Design and Detailing
- High Strength Structural Strand
- Custom Finishes
- Pre-stretching
- Striping
- Measuring Wire Rope
- Corrosion Protection
- End Terminations
- Attaching Sockets
- Proof loading
- Order Specifications
- Wire Rope Selection
- Rotation-Resistant Ropes
- Specialized Wire Rope
- Wire Rope Handling and Installation
- Standard Operating Practices
- Wire Rope Inspection
- Technical Info & Specifications
Drum & Sheave Inspection
Drums
Inspect the flanges for wear, chips, cracks and bending. Inspect the Lebus grooving (if so equipped), visor and kicker plates for wear. Also look for rope imprinting damage.
Sheaves
Examine the sheave grooves for wear and proper diameter. To check the size, contour and amount of wear, use a sheave gage. The gage should contact the groove for about 150° of arc.
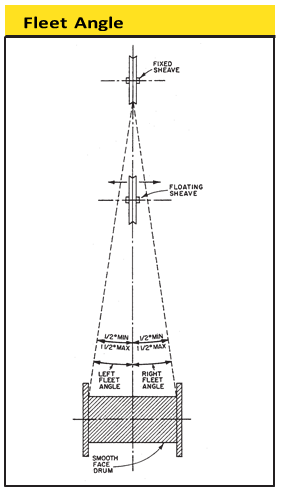
Inspect the fleet angle for poor sheave alignment. The fleet angle is the side, or included, angle between a line drawn through the middle of a sheave and a drum, perpendicular to the axis of each, and a line drawn from the intersection of the drum and its flange to the base of the groove in the sheave. The intersection of the drum and its flange represents the farthest position to which the rope can travel across the drum. There are left and right angles, measured to the left or right of the center line of the sheave, respectively. It is important to maintain a proper fleet angle on installations where wire rope passes over a lead sheave and onto a drum. A fleet angle larger than recommended limits can result in excessive rubbing of the rope against the flanges of the sheave groove, or crushing and abrasion of the rope on the drum. This angle, for maximum efficiency and service, should not be more than 1-1/2 degrees for a smooth drum, nor more than 2 degrees if the drum is grooved. The minimum angle which ensures that the rope will cross back and start a second layer in a normal manner, without mechanical assistance, should be 0 degrees 30 minutes. For smooth faced drums, this works out to a distance of 38 feet for each foot (76 feet for two feet) of side travel from the center line of the sheaves to the flange of the drum. For a grooved drum, the distance is 29 feet.
Other conditions which may exist include:
Corrugated sheaves. Easily noticed, corrugated sheaves should be machined or preferably replaced.
Worn sheaves. If sheaves are wearing to one side, move the sheave to correct the fleet angle and alignment.
Broken flanges. Broken sheave flanges enable wire rope to jump the sheave and become badly cut or sheared. Replace the sheaves.
Out-of-round sheaves. A sheave with a flat spot throws a “whip” into the rope at every sheave revolution. This may cause wire fatigue at the attachment end where vibration due to the whipping is usually dampened or stopped. Machine or replace the sheave.

Synthetic Sheaves
When using synthetic sheaves or synthetic-lined steel sheaves, the inspector must carefully examine the rope for diameter reduction or lengthening of lay, even if no visible damage is observed. Synthetic sheaves greatly increase the contact area between the wire rope and sheave, by cushioning the rope. This cushioning effect causes wire rope to wear internally (wire rope operating on steel sheaves will first wear externally) before the damage is noted on the outer wires. This situation places the inspector at a great disadvantage; therefore, he/she must be diligent in the detection of diameter reduction and lay lengthening to prevent catastrophic failure from internal core damage.
Bearings
Check the bearings for lubrication, signs of wobble and ease of rotation. Worn bearings cause vibration in the rope, increasing wire fatigue. Repair the bearings or replace the sheave.
Rollers and Fairleads
Inspect rollers and fairleads for ease of rotation and worn grooves, which may cut the wires. These rollers should be covered with either rubber or a polymer material to further prevent rope abrasion damage.

